Setting up a custom Identity Provider
PERMISSIONS Security level with Admin permission to configure Client Portal & Taskfire. Refer to Admin security settings.
PERMISSIONS Administrative permissions to configure the client's identity provider.
NAVIGATION Left Navigation Menu > Admin > Admin Categories > Extensions & Integrations > Client Portal & Taskfire > Manage Client Portal Organizations > context menu > Configure IdP
Overview
Previously, Client Portal users were able to log in to the Client Portal using credentials provided when their Client Portal access was set up, or they could use their Microsoft or Google account, if the associated email address was setup as the primary email address in Autotask. These options did not require any additional configuration.
Autotask now also supports access to the Client Portal using a custom Identity Provider (IdP).
On this page, you enable and configure the integration between a client's instance of the Autotask Client Portal and their custom Identity Provider (IdP). Optionally, you can remove the public IdP options (Google and Microsoft) from the Client Portal login page, and even bypass the login page completely.
This topic is limited to the description of the custom IdP configuration steps in Autotask, but the integration also requires configuration steps in the selected Identity Provider application, where
- an app must be created and configured
- users and groups must be assigned to it
Please consult the documentation of the selected identity provider.
IMPORTANT Given the number of available options, please understand that our Support teams are not able to assist you with the setup and troubleshooting. The integration must be configured by an IT professional with experience in setting up SSO integrations.
The IdP must support the SAML (Security Assertion Markup Language) 2.0 protocol. SAML is an XML-based open standard for transferring identity data between
- an IdP, who performs authentication and passes the user’s identity and authorization level to the service provider
- a service provider (SP) who trusts the identity provider and authorizes the user to access the application
Here, the Client Portal is the service provider.
The information used in the SAML protocol to expose the configuration of an SP or IdP is called metadata. This integration requires the following information:
- An Entity ID that uniquely identifies the IdP or SP
- The location where information must be sent to (the Single Sign-On Service of the IdP or the Assertion Consumer Service of the SP)
- A Certificate that contains the signature of the metadata and public keys for verifying and encrypting further communication
Similar to a phone book, metadata does not contain any secret information. It is usually available on a metadata URL or in a metadata file that can be downloaded.
Okta help
Assign an app integration to a group
Azure help
Quickstart: Add an enterprise application
Quickstart: Create and assign a user account
Enable single sign-on for an enterprise application
Auth0 help
Configure Auth0 as SAML Identity Provider
NOTE We found that configuring Auth0 in Firefox required additional steps. We recommend using Chrome.
Configuration steps
To configure the integration, do the following:
- To open the page, use the path(s) in the Security and navigation section above.
- Open the website of the identity provider. You will need to copy information from several fields and paste them into Autotask, and vice versa.
- In Autotask, complete the following sections:
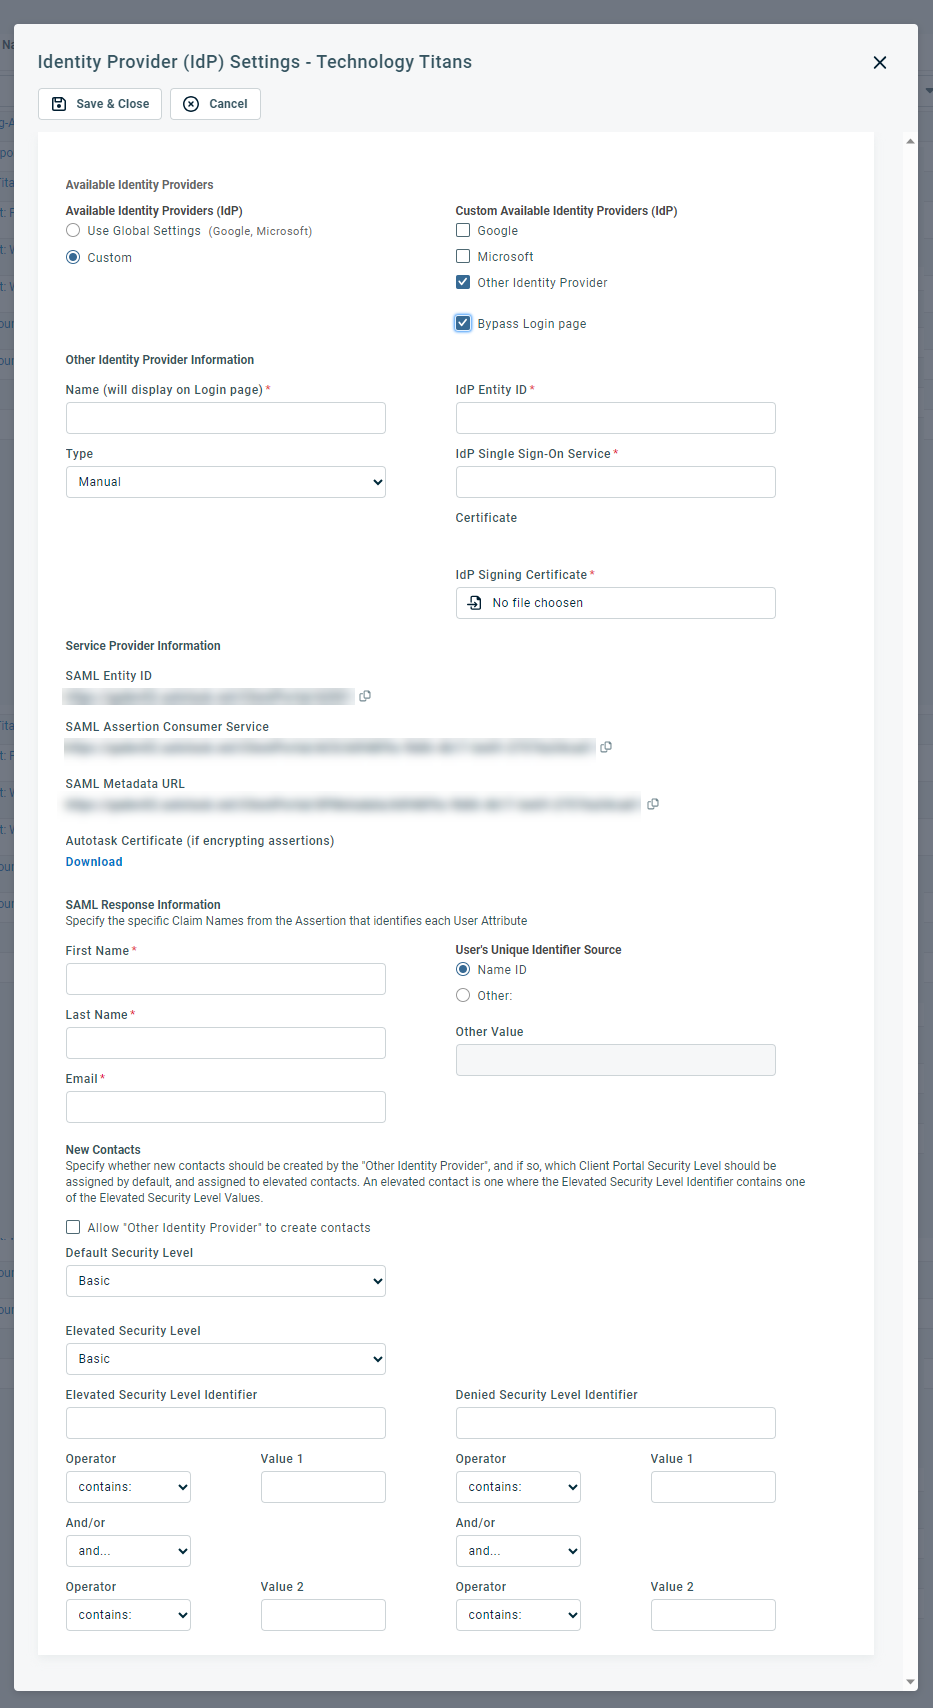
Available Identity Providers
In this section, you manage the availability of public identity providers Google and Microsoft, and enable the configuration of a custom identity provider for the organization.
Radio buttons
By default, all customers use the settings configured on the Global Client Portal Settings page. To configure a custom IdP and expose additional fields, toggle the radio button to Custom.
Custom Available Identity Providers (IdP)
Select all identity providers this customer's contacts will be able to use to log into the Client Portal.
- Google and Microsoft will be selected if they are selected on the Global Settings page. If you want client users to authenticate solely through their IdP, clear the check boxes. If you want to provide client users with multiple login options, leave them selected.
- To configure a custom identity provider, select Other Identity Provider. The rest of the page will be revealed to allow you to configure the integration.
Bypass Login page
This check box is enabled if Other Identity Provider is the only available identity provider.
- If selected, the Client Portal login page will be bypassed.
- If the Google or Microsoft login options are available, the user is directed to the Client Portal login page to select a login option.
NOTE If you disable a custom IdP after it has been in use, Single Sign-On will be disabled for all users. Make sure users know how to log in using their Client Portal credentials.
In this section, you enter the data that uniquely identifies the identity provider. This information is available on the IdP website, either on a metadata URL, or as a metadata file that you can download. Depending on the IdP, the location will vary, but metadata will generally include the following information:
- The IdP Entity ID
- The digital certificate that confirms who is sending the SAML assertion
- The SingleSignOnService: The single sign-on service specifies the endpoint that receives SAML authn requests. We currently only support sending the request using the following SingleSignOnService binding: urn:oasis:names:tc:SAML:2.0:bindings:HTTP-Redirect
Complete the following fields:
Field Description Copy from Name (will display on the login page)
Enter a display name for the identity provider. This name will appear on the login page below the Username and Password fields, and the Google and Microsoft authentication options if they are enabled. IdP names are limited to 30 characters..
N/A
Type
Select how you will provide the information that is necessary for the interaction between the Identify Provider and Autotask Client Portal (the Service Provider). There are three options:
- Manual: You will manually populate the IdP Entity ID and the IdP Single Sign-On Service fields, and upload the IdP Signing Certificate.
- Metadata URL: You will fetch the required metadata from the URL specified in the Metadata URL field.
- Metadata File: You will upload a metadata file you have downloaded from the IdP.
Depending on your choice, additional fields will appear.
N/A
Metadata URL (only appears if you selected Metadata URL)
Enter the URL where the metadata is available. The location of the URL will be available on the integration page of the identity provider.
N/A
Get IdP Information (only appears if you selected Metadata URL)
Click the button to obtain the required information and populate the remaining fields.
N/A
Metdata File (only appears if you selected Metadata File)
The SAML metadata file is an XML document that contains all the information necessary for the interaction between the identity provider and the service provider. The document contains URLs of endpoints, information about supported bindings, identifiers, and public keys.
Download the metadata file from the IdP. Then click Choose File and upload it.
N/A
IdP Entity ID
The IdP Entity ID is the globally unique name for the Identity Provider (IdP). The SAML entity ID must be a Universal Resource Identifier (URI). It need not be a resolvable web location, it simply must be a unique, persistent name for the entity.
This field is included in the metadata file and available on the metadata URL.
AD: Azure AD Identifier Okta: Identity Provider Issuer
Auth0: Issuer
IdP Single Sign-On Service
This field contains the URL the SAML request must be sent to. A SAML request to authenticate the user is sent from the SP when the user attempts to log in. We currently only support sending the request using the following SingleSignOnService binding: urn:oasis:names:tc:SAML:2.0:bindings:HTTP-Redirect
AD: Login URL Okta: Identity Provider Single Sign-On URL
Auth0: Identity Provider Login URL
This field displays all certificates that are cached for this client's SSO configuration. To delete a certificate, click the delete icon
next to the certificate name.
IdP Signing Certificate
This is the digital signature that allows the SP to validate and trust the SAML response. It is included in the metadata file and available on the metadata URL. If you selected a manual configuration, you must upload the certificate. Click Choose File and select the certificate file.
The following formats are supported: .pem, .cert, .cer, .crt.
AD: Certificate (Base64) or Certificate (Raw) Okta: X.509 Certificate
Auth0: Identity Provider Certificate
This section provides the metadata information that the IdP needs to communicate with the Autotask Client Portal. They are generated in Autotask. You copy them to the clipboard and paste them into the appropriate fields on your IdP's Service Provider configuration page.
Field Description Paste to: SAML Entity ID
The SAML Entity ID uniquely identifies the Autotask Client Portal as a service provider. It includes the MSP's enterprise ID as part of the name.
Click the copy icon
to copy this ID to the clipboard.
AD: Identifier (Entity ID)
Okta: Audience URI (SP Entity ID)
Auth0: "audience"
SAML Assertion Consumer Service
This is the URL where the IdP will send the SAML Response (Assertion). We currently only support receiving the response using the following binding: urn:oasis:names:tc:SAML:2.0:bindings:HTTP-POST.
Click the copy icon
AD: Reply URL (Assertion Consumer Service)
Okta: Single sign-on URL
Auth0: Application Callback URL
SAML Metadata URL
This is the location where the IdP will fetch the metadata for this instance of the Client Portal.
Click the copy icon
AD:
Okta: Encryption Certificate
Auth0:
Autotask Certificate (if encrypting assertions)
Click the Download link to download the public Autotask certificate, AutotaskCertificate.cer. This certificate will be used by the IdP to encrypt SAML Assertions.
When the IdP generates an assertion and sends it to the Client Portal SAML Assertion Consumer Service URL, the user who is attempting to authenticate must be matched to a user in the Client Portal. There are a number of possible scenarios:
The user has successfully authenticated before
In this case, the Unique Identifier (UID) has previously been saved in your Autotask instance. The user is uniquely identified and logged in.
This is the first time the user is authenticating using the IdP
Here, we use the claim names that are sent with the assertion to match the IdP user attribute fields to the Client Portal user attribute fields.
- If the Email field is a unique match, the IdP Unique Identifier (UID) is saved to the Client Portal, and the user is logged in.
- If there is no match on email and the integration has been configured to allow the creation of new contacts, the First Name, Last Name, and Email are used to create a new user. Refer to New Contacts.
- If there are multiple matches on email, the login will fail.
To map the Autotask field names to the user attribute names of the IdP, do the following:
Field Description First Name
Enter the IdP Claim Name (not the Value) for each field.
NOTE Some IdPs are sending the claim names by default, for others, you must configure the Attribute Statements in the IdP to include this information.
Last Name
User's Unique Identifier Source
This setting defaults to Name ID. The Name ID is the IdP's unique identifier for a user. If you do not want to map users based on the Name ID, toggle the radio button to Other and select a different claim name, such as Email.
When a new user is logging into the Client Portal, we attempt to find a user based on the Email field.
Other Value
The Other Value field will only be required if the Other radio button is selected. Enter the IdP attribute name that will be used as the unique identifier.
When a user is added to the IdP database and is trying to log in for the first time, you can configure the integration settings to automatically create a Client Portal user account and an Autotask contact. The fields of the New Contact record will be populated by information supplied with the SAML assertion, selections you make in this section, and default settings in the Client Portal.
Field Description Allow "Other Identity Provider" to create contacts
Select this check box to enable the setting.
- The Username will be set to the email address contained in the SAML assertion.
- The First Name and Last Name will be set to the Claim Names as mapped from the SAML response.
Default Security Level
Select the default Client Portal security level for new contacts created by the IdP. Refer to Managing Client Portal and Taskfire security levels.
This security level will be assigned to all newly created users who are not associated with an Elevated Security Level Identifier.
NOTE Only Client Portal security levels are supported. Taskfire security levels are not supported.
Elevated Security Level
Select the elevated Client Portal security level for new contacts created by the IdP.
Elevated Security Level Identifier
Enter the claim name, for example, Role, that would indicate that the user should be assigned an elevated security level.
Enter the claim name that contains the values that will result in the user being denied Client Portal access from the identity provider. Multiple values are separated by a space.
Conditional expression (Operator, And/or, Value)
Enter the conditional expression that will result in a user being assigned an elevated security level, or being denied access.
Elevated Security Level Value 1, 2, or 3
Specify up to three values in the claim name selected above that will result in the user being assigned the elevated security level. Multiple values are separated by a space.
NOTE The Date Format, Time Format, and Number Format will be set to the default values used when creating the Client Portal user in Autotask or the Client Portal.
- Click Save & Close.
- To test the integration, open the Client Portal Client Detail page, and in the General section, click on the Client Portal Login link. You will see the custom identity provider option on the login page.
If you assigned the integration to the user account you were using to configure the integration, you can click the link and log in!
Videos
Here are the links to 3 videos that show how to set up the integration:


