About tickets
A ticket is an electronic form that tracks everything about a customer service engagement. It captures the problem or service request, additional notes or attachments, and tracks time, materials, and expenses.
Tickets can be created by all users. If your local organization has enabled Incoming Email Processing, they can also be created by converting customer emails. Refer to About Incoming Email Processing.
Creating a ticket
On the top navigation menu, select > Service Desk > Ticket. The New Ticket page will open with Support Ticket default ticket category pre-selected, and the ticket stopwatch will begin to run.
We have pre-configured the following settings for the fields listed in this table:
Ticket Category
|
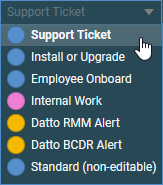
By default, all manually created tickets are assigned the Support Ticket category. The category determines the ticket layout and the options for the fields on the Details panel on the left. Your Autotask instance comes with a set of pre-configured categories that cover most situations.
If Datto RMM is enabled, those tickets are automatically assigned the Datto RMM Alert category.
|
Ticket Type
|
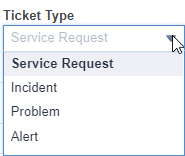
The Ticket Type is defaulted to Service Request. For now, this is fine. As you learn more about Autotask, you can begin using the ITIL ticket types.
|
Status
|
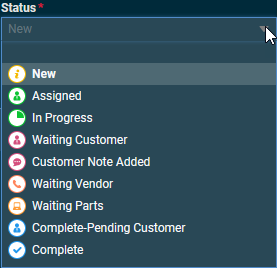
The Status field tells you where the ticket is on its path to a resolution. It is very important that the status is set correctly, because the Status field is used in dashboard widgets and workflow rules:
- New tickets default to New.
- Assigned means that an individual technician has been assigned as a primary resource.
- In Progress identifies a ticket that is currently being worked on.
- Waiting Customer means that a customer response is required before the work can proceed.
- Customer Note Added means the customer has added a note in the Client Portal or sent an email that references the ticket number.
- Waiting Vendor means that you are waiting for information (such as pricing) from a vendor.
- Waiting Parts means a part that is required from a vendor has not arrived yet.
- Complete Pending Customer means this ticket is completed, and the customer has been informed of the solution. Unless the customer responds within a certain time (setting the status back to Customer Note Added), a workflow rule will update the ticket to Complete.
- Complete means the ticket is closed.
You manage ticket statuses on this page: Left Navigation Menu > Admin > Admin Categories > Features & Settings > Service Desk (Tickets) > Task & Ticket Statuses.
|
Priority
|
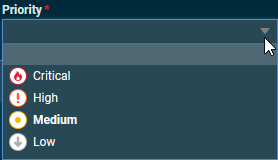
Priority describes the urgency with which the ticket must be addressed. Usually, the priority depends on the number of people impacted by a problem (technical priority) and the importance of the customer to your business (business priority).
EXAMPLE When a server is down (impacting dozens of people), the priority is high. When one computer is down, one person is impacted, and the priority is medium. When one of 3 printers is down, people are slightly inconvenienced, but a workaround exists. The priority is low.
If the business priority is also high, you may want to upgrade the priority one step. A server down at an important customer location is critical.
You manage ticket priorities on this page: Left Navigation Menu > Admin > Admin Categories > Features & Settings > Service Desk (Tickets) > Task & Ticket Priorities.
|
Issue Type, Sub-Issue Type
|
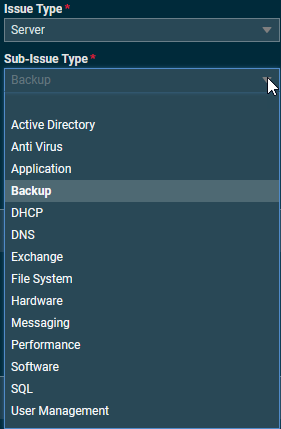
These 2 fields allow you to categorize the problem. This is useful for assigning the ticket to certain queues or technicians, either manually or by using workflow rules.
You manage issues and sub-issues on this page: Left Navigation Menu > Admin > Admin Categories > Features & Settings > Service Desk (Tickets) > Issue & Sub-Issue Types.
|
Queue
|
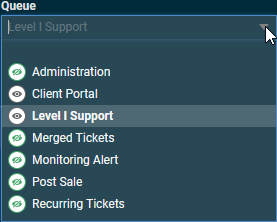
Queues are like folders for tickets. For your tickets, Level I Support is the default queue, and tickets in this and the Client Portal queue can be viewed by your customers, while all others cannot.
You manage queues on this page: Left Navigation Menu > Admin > Admin Categories > Features & Settings > Service Desk (Tickets) > Queues.
|
Work Type
|
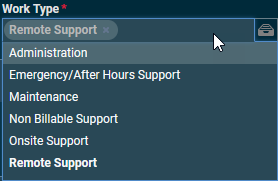
The work type describes the nature of the work and is very important for billing. It will modify the role rate of the technician. The settings in your Autotask instance are as follows:
- Administration (not billable)
- Emergency / After-Hours Support (role rate): this is the after-hours work type for all other work types
- Maintenance (role rate)
- Non Billable Support (not billable)
- Onsite Support (role rate)
- Remote Support (role rate): this is the default setting
- Travel (role rate)
The owner can easily modify these settings on this page: Left Navigation Menu > Admin > Admin Categories > Features & Settings > Finance, Accounting & Invoicing > Billing Codes.
|
For all fields except Ticket Type, your business owner can add additional options and edit existing ones.
Working on a ticket
Tracking your labor, materials, and expenses on a ticket should never be an afterthought, because this is how the business and ultimately all its employees are getting paid. If you don't track things right away, it is easy to forget something and bill less than your business is entitled to.
Tracking your time
Tracking your time accurately is important because, depending on the billing arrangement, it is either directly billed to the customer or at least reported to the customer, showing the value of your services. For you as the technician, time tracked on tickets counts against your Weekly Billable Hours Goal, an important performance metric:
- To manually enter time, use the Quick Add Bar.
If the ticket stopwatch is running, click the Record icon.
- Complete all required fields. Pay special attention to the Summary Notes field, where you describe the work you did. Summary notes can appear on the customer invoice and are reviewed by your manager. For field descriptions, refer to the context-sensitive help on this page: Ticket page > Quick Action bar > Time Entry (Alt + 1).
Tracking materials (charges)
Often, fixing a problem involves using materials or hardware. Tracking these items is just as important as tracking your time, because your local organization will have to procure them from external vendors.
In your Autotask instance, all materials you are likely to use in conjunction with a ticket have been imported into the Products table. You simply need to make the correct selection.
- To add a charge, use the Quick Add Bar.
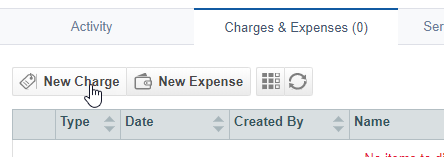
You can also add a charge from the Charges & Expenses accessory tab.
- Click the icon next to the Product field and select the item from the products list. The Material Code, Charge Name, and Description, as well as the Unit Cost and Unit Price are automatically filled in.
- Update the Quantity as needed.
- Save the charge.
For field descriptions, refer to the context-sensitive help on this page: Ticket page > Quick Action bar > Charge (Alt + 4).
![]() > Service Desk > Ticket. The New Ticket page will open with Support Ticket default ticket category pre-selected, and the ticket stopwatch will begin to run.
> Service Desk > Ticket. The New Ticket page will open with Support Ticket default ticket category pre-selected, and the ticket stopwatch will begin to run. ![]()
