Workflow rules to send tickets to Taskfire
PERMISSIONS Security level with Admin permission to configure Workflow Rules. For Service Desk workflow rules only, Admin permission to configure Service Desk (Tickets). Refer to Admin security settings.
NAVIGATION Left Navigation Menu > Admin > Admin Categories > Automation > Workflow Rules > Workflow Rules
When you enable Taskfire for a client, it is common that you share the responsibilities for support with their internal helpdesk. On the Ticket page, you can transfer a ticket to Taskfire and even select a specific Taskfire queue and resource, but this process is not very efficient. Refer to Save & Assign to Taskfire.
If you and your client have set up clear rules for the kind of tickets they will be responsible themselves, you can automate this process by setting up workflow rules that will automatically transfer tickets to Taskfire.
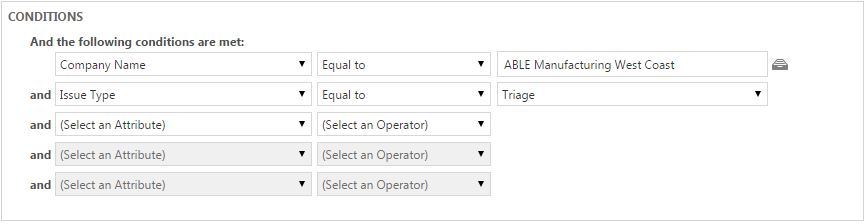
EXAMPLE Your client's internal helpdesk is responsible for all tickets with an issue type of "Printer" and a priority of "Low" or "Medium".
To create the workflow rule, do the following:
- To open the page, use the path(s) in the Security and navigation section above.
- In the Conditions area, select the client the workflow rule will apply to, and any other conditions you would like met before the workflow rule is initiated.
- In the Updates area, set the Queue Name to a queue that is visible to Client Portal users. If a ticket is assigned to a queue that is not visible in the Client Portal, the workflow rule cannot transfer that ticket to Taskfire.
- In the Actions area, select Then transfer ticket to: Taskfire.
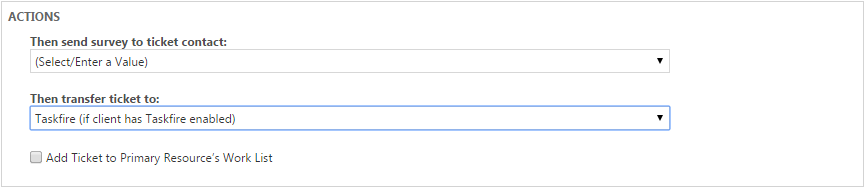
- If you would like to notify resources in Autotask that the ticket was transferred, click the Notification tab and add the users. Taskfire users cannot be notified using a workflow rule.
- Click Save & Close.
The ticket is transferred to the selected queue in Taskfire. If no queue was assigned, it is transferred to the General queue.
For details on creating workflow rules, refer to Adding, editing, and copying workflow rules.
NOTE If Taskfire is disabled for the client after the workflow rule has been created, the workflow rule is deactivated.


