Configuring the MS Exchange Extension for an on-premises installation
PERMISSIONS Security level with Admin permission to configure Microsoft Extensions. Refer to Admin security settings.
NAVIGATION Left Navigation Menu > Admin > Admin Categories > Extensions & Integrations > Microsoft Extensions > MS Exchange
This topic covers the configuration of the integration between Autotask and MS Exchange when MS Exchange server is on-premises, rather than using Microsoft Office 365 or a third-party hosted environment. For other configurations, refer to How to set up the MS Exchange Extension.
To synchronize data, Autotask must authenticate to the Exchange server. For on-premises installations, you can use Basic Authentication. The Basic Authentication requires a dedicated user account (the synchronization account). Once created, its credentials will be used to access the Exchange server. Refer to Setting up the MS Exchange synchronization account.
To get started with the MS Exchange Extension configuration for an on-premises installation using Basic Authentication, do the following:
- Enable Outlook Web Access (OWA).
- If you have this option and want to use it, ensure that Exchange Web Services (EWS) is turned on. This should happen automatically when Outlook Web Access is enabled. Your synchronization account user must have access to the Web Services.
- Confirm the available ports for Autotask. For custom configurations where standard ports TCP 80 and 443 are not available for Autotask outgoing requests to customer servers, Autotask security now permits the use of port 2610.
- Ensure that your MS Exchange Server uses an SSL certificate that has been signed by a Trusted Certificate Authority, such as Verisign, Thawte, or GoDaddy. Autotask will not accept self-signed or free certificates.
- If you are using Basic Authentication, set up the synchronization account in MS Exchange. Refer to Setting up the MS Exchange synchronization account
- Complete the MS Exchange Extension Configuration page. To open the page, use the path(s) in the Security and navigation section above.
- Populate all required fields as described below.
- Click Save when you are done.
NOTE Basic Authentication is being deprecated by Microsoft. For more information, refer to Deprecation of Basic authentication in Exchange Online.
How to . . .
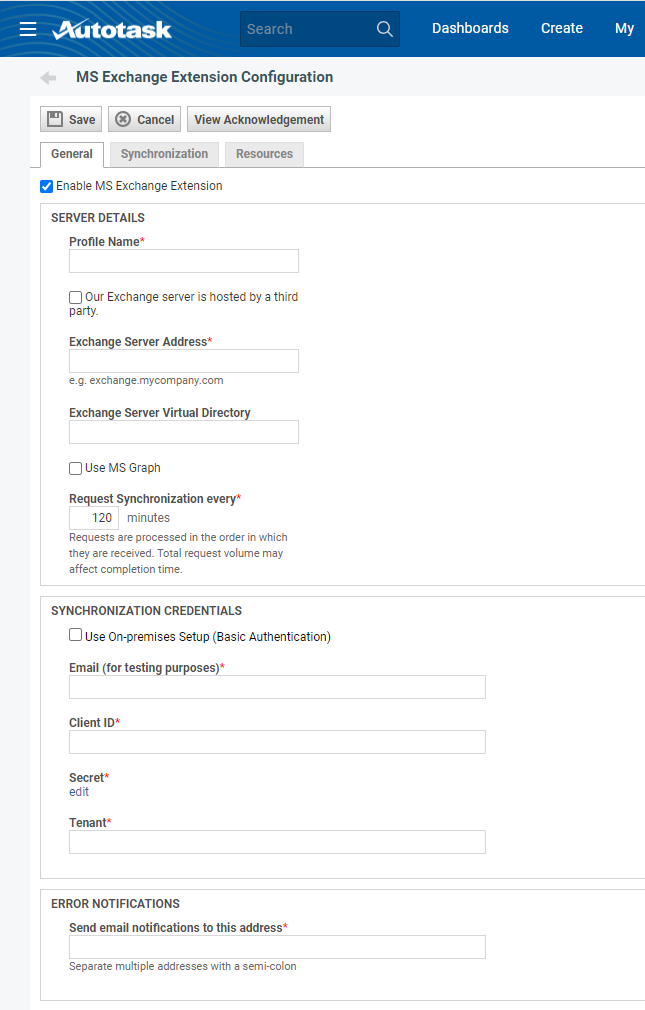
On this tab, you enable the MS Exchange extension, enter server details and synchronization credentials, and determine who will receive error notifications.
Once the setup is complete, the MS Exchange Server configuration settings are checked using the settings in the Synchronization Credentials section. You will receive a confirmation message if the configuration settings work or an error message if they fail. Items that cannot be validated will show a warning icon.
NOTE If you make changes to the Version, Exchange Server Address, Exchange Server Virtual Directory, or Domain fields, all items will be re-synchronized automatically when you save the change. If synchronization is occurring when you are trying to save new settings, you will receive an error message and will need to try again when the current synchronization is complete.
| Check box | Description |
|---|---|
|
Enable MS Exchange Integration |
This check box is selected by default. Synchronization will begin as soon as you successfully save the integration settings. If you would like to configure your settings and turn the extension on at a later time, clear this check box before you begin. |
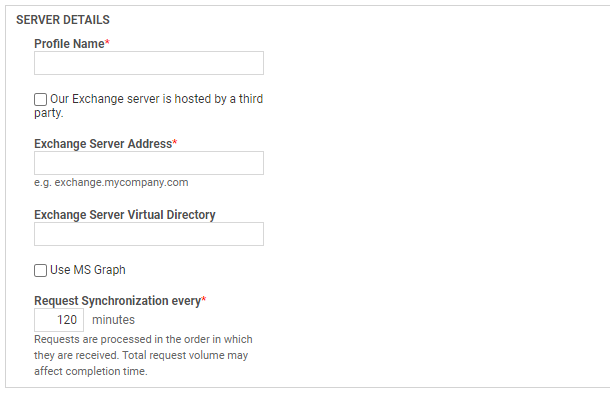
Populate the Server Details section as follows:
| Field Name | Description |
|---|---|
| Profile Name* | Enter any profile name that works for you. |
|
Our Exchange server is hosted by a third party |
When hosting on-premises, leave this check box cleared. |
| Exchange Server Address* | Enter the server address of your MS Exchange server. Do not use the server IP address in this field! |
| Exchange Server Virtual Directory | Leave this field blank. |
|
Use MS Graph |
The check box will be hidden when Use On-premises Setup (Basic Authentication) is selected in the Synchronization Credentials section below. |
| Request Synchronization every* | Enter the synchronization interval, in minutes. The interval must be at least 10 minutes, but note that the actual synchronization time may be longer, depending on other items queued up at the MS Exchange Server. If you receive an error such as "We are unable to save your changes at this time because there is a sync in progress, please try later," increase the Request Synchronization every interval to at least an hour to ensure that the new sync will not begin before the previous one has ended. Once the sync has completed, save your changes and optionally adjust the time back. |
To synchronize data, Autotask must authenticate to the Exchange server. For on-premises installations, you can use Basic Authentication. You must set up a dedicated user account (the synchronization account), and use its credentials to access the Exchange server. Refer to Setting up the MS Exchange synchronization account if you have not yet completed this step.
After you have set up the MS Exchange synchronization account, populate or edit the Synchronization Credentials section on the General tab as follows:
| Field | |
|---|---|
| Use On-premises Setup (Basic Authentication) | Select this check box. The page will be refreshed, and the following different fields must be completed: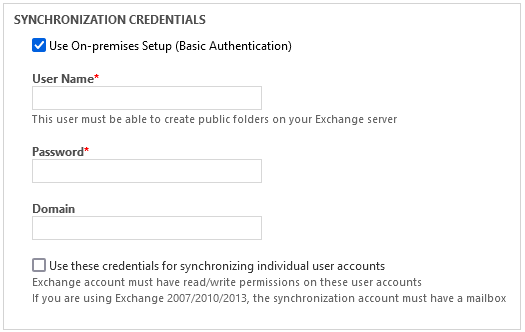 |
| User Name and Password | Enter the username and password (maximally 128 digits) of the MS Exchange account that will be used to synchronize data between MS Exchange and Autotask. This account must meet the following criteria:
This user's credentials will be used to test the connection to MS Exchange when the configuration settings are saved. |
| Domain |
Enter the user's MS Exchange Server domain name. If the username you added contains the domain, this field is not required. |
| Use these credentials for synchronizing individual user accounts | This check box controls whether the synchronization account or the individual user accounts are used for authentication.
|
| Field | Description |
|---|---|
| Send email notifications | Enter the email addresses of the person or people who should receive notification if the MS Exchange Extension encounters problems or errors (for example, if the MS Exchange Server goes down and synchronization is not able to run). Separate email addresses with a semi-colon. |
The Synchronization tab allows you to configure the types of calendar items that will be exported to and from MS Exchange, and the default number of past and future days to synchronize events for.

| Field | Description |
|---|---|
| Allow Appointments | Select this check box to export Autotask appointments to MS Exchange. If selected, your users will see their Autotask appointments in Microsoft Outlook
or another email client or calendar application your organization is using. If this check box is NOT selected, the Synchronize Autotask Appointments to Exchange check box on the user profile page will be disabled. |
| Allow Contacts where resource is account manager or opportunity owner | If this box is selected, Autotask contacts for which the user is the account manager or
opportunity owner will be transferred to Exchange and its client applications. IMPORTANT If you are also using the Autotask MS Outlook Extension while the MS Exchange Extension is enabled and you select this check box, you will not be able to sync contacts using the Outlook Extension. In order to use the Outlook Extension to sync all contacts, clear this check box. |
| Allow Service Calls | Select this check box to export the user's Service Calls from Autotask to MS Exchange. |
| Allow To-Dos | Select this check box to import/export To-Dos assigned to you from Autotask to MS Exchange. |
| Create public folder of ALL
Autotask contacts (only if using EWS) |
Select this check box to create a public folder on your MS Exchange server,
populated with all Autotask contacts. IMPORTANT This folder will be available to all MS Exchange users, not just the ones who will be using the Autotask integration. Before you select this option, think about the security implications. If selected, any Exchange user can download your all contact data to their PC. |
| Field | Description |
|---|---|
| Appointments with ALL detail information | Select this option to import appointments from MS Exchange with all text and participant information included. |
| Appointments with no detail information | Select this option to import appointments, but with only the appointment start and end times. |
| Do not import Exchange appointments | Select this option if you do not want to import any appointments from MS
Exchange. NOTE If this check box is selected, the Synchronize Exchange Appointments to Autotask check box on the user profile page will be disabled. |
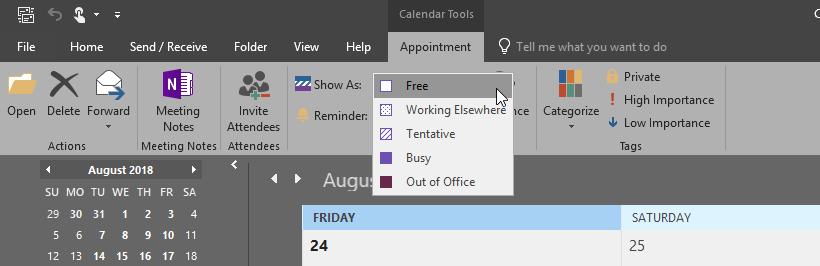
| Send "free time" appointments to Autotask (if cleared, "free time" appointments will not be sent)
|
This check box is disabled if the Do not import Exchange appointments radio button is selected. By default, MS Exchange or Outlook appointments where time is shown as "Free Time" are still synced to Autotask and block time on the user's calendar. Clear this setting to prevent synchronization of free time appointments.
NOTE Free time appointments do not count towards resource availability and resource productivity. NOTE You must also disable the ability to send "free time" appointments in the Microsoft Outlook Extension if you disable this setting. Refer to Configuring the Outlook extension. |
| Field | Description |
|---|---|
| Past calendar items | Enter the default number of days the integration should go back to look for data to synchronize. The minimum value in this field is "1" and the maximum is "30." |
| Recurring calendar items | Enter the default number of days in the future the MS Exchange Extension should look for recurring calendar items to synchronize. The minimum value in this field is "1" and the maximum is "30." |
The Resources tab lists all Autotask users in your Autotask instance. On this tab, you can enable the extension for one or more users, view the date and time of each resource's most recent synchronization attempt, and open a page similar to the MS Exchange tab on the Profile page of any resource to configure their user profile.
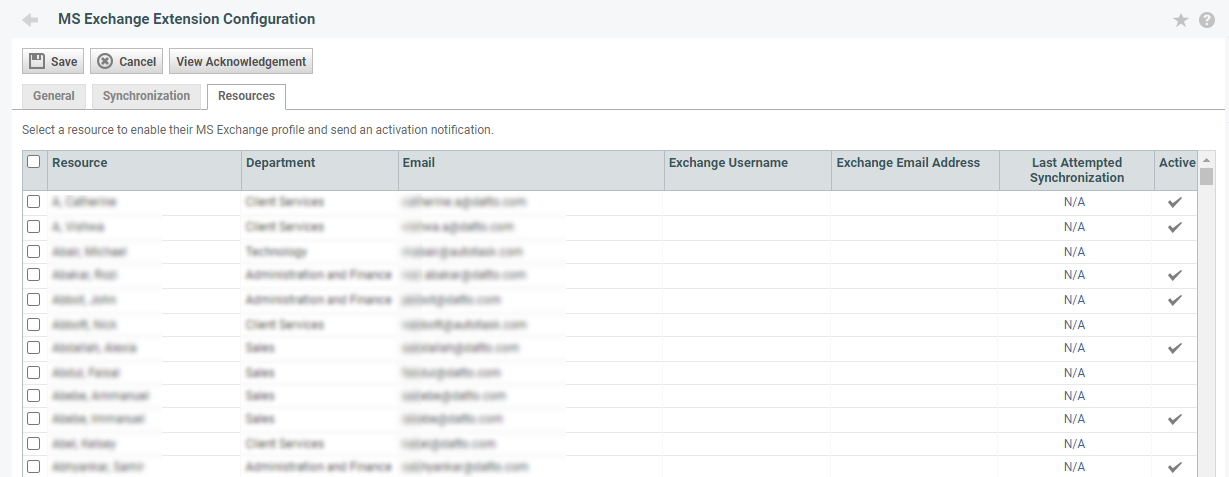
NOTE The users for whom the Exchange extension is enabled do not have to synchronize their calendar items and contacts. On their Profile page, they have complete control over this feature. They can disable settings, or they can selectively enable the items they want to synchronize.
To turn on the MS Exchange Extension for one or multiple users, do the following:
- Select the check box in the header row to select all resources, or select individual users.
- Click Save.
- Optionally. configure individual users' synchronization settings by clicking the time stamp or N/A link in the Last Attempted Synchronization column. Refer to Configuring user profiles for MS Exchange.
All newly enabled resources are sent a confirmation email with instructions on how to customize the MS Exchange synchronization settings on their Profile page.
Data synchronization is not automatic; it must be explicitly enabled and configured for each user. The configuration can be done by the user, or by the administrator.
Administrators:
- Go to Left Navigation Menu > Admin > Admin Categories > Extensions & Integrations > Microsoft Extensions > MS Exchange > Resources tab.
- Locate the resource whose profile you want to configure.
- To the open User Profile Advanced Settings page, click on the date and time link in the Last Attempted Synchronization column.
- Complete the fields on the tab. Refer to The MS Exchange tab.
Users:
NAVIGATION My > Miscellaneous > Profile
- Select Miscellaneous > Profile.
- Click the MS Exchange tab.
- Complete the fields on the tab. Refer to The MS Exchange tab.


